Installation Tips for InGround Basketball Hoops

InGround Installation – Short Version
Day 1
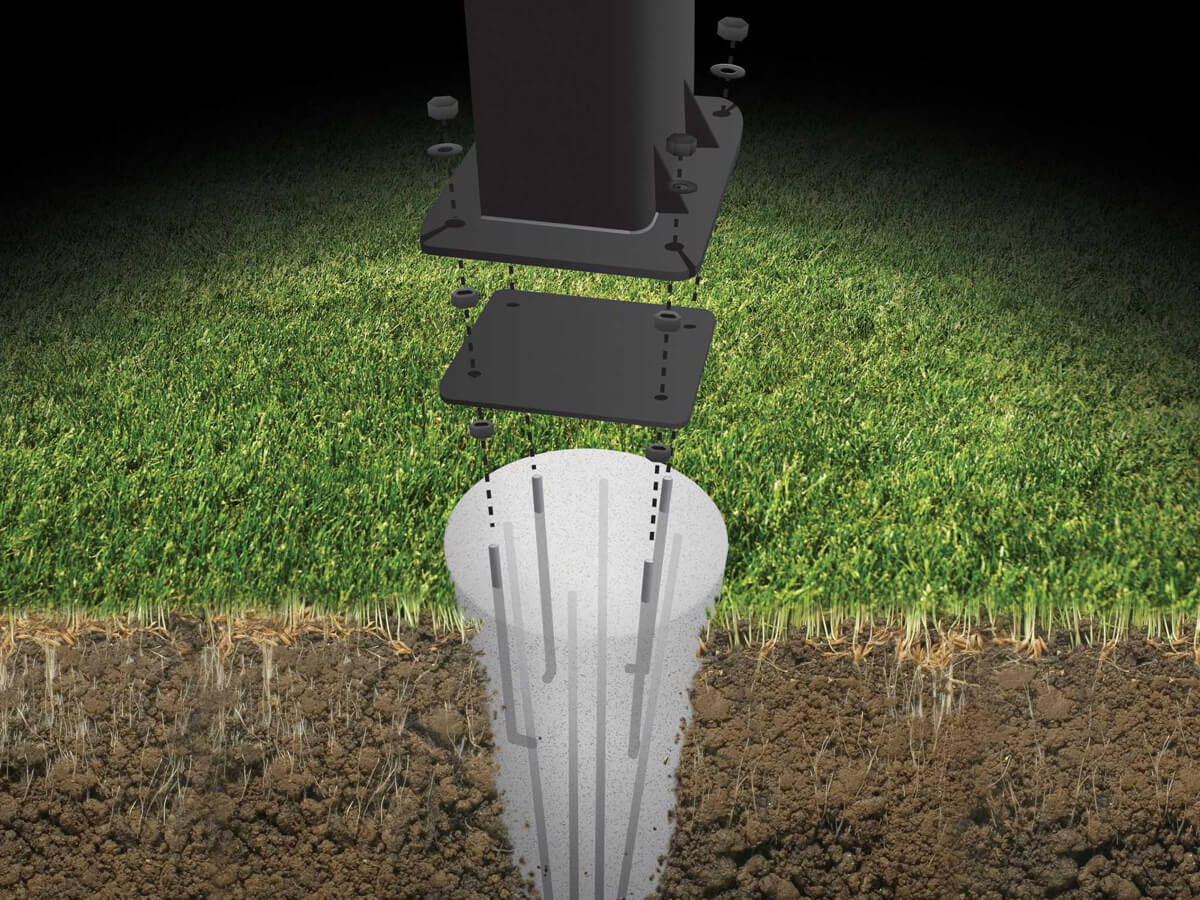
- Dig 4’ deep, 18” diameter hole
- Mix and pour concrete
- Set ground anchor
- Let concrete cure a minimum of 72 hours
Day 2
- Build the hoop
- Place the hoop step by step on the anchor system
TIPS:
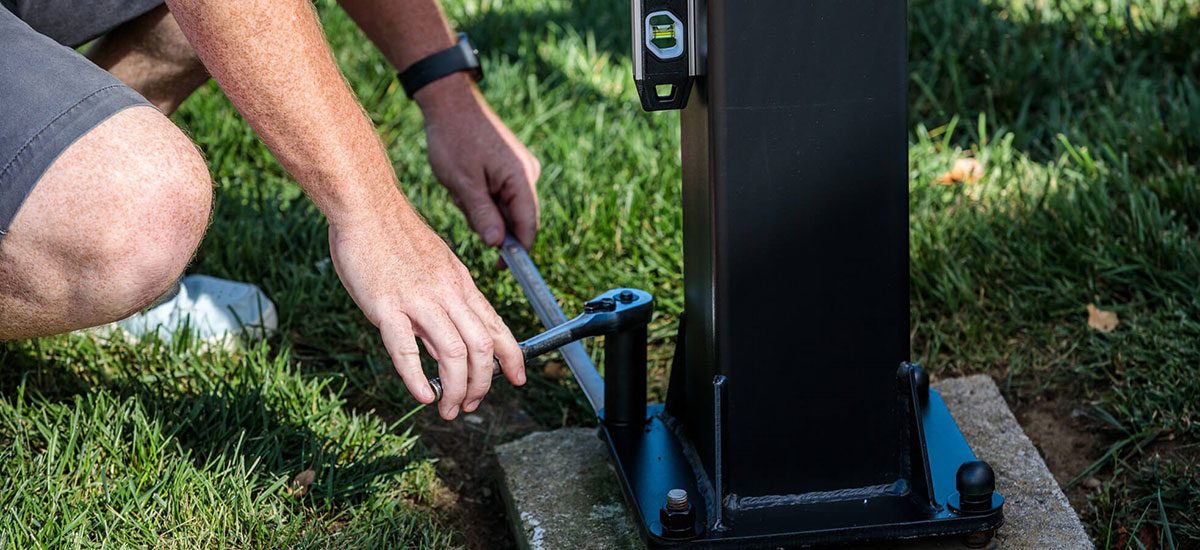
1. Use a spirit level to ensure that the basket is aligned straight upright and offers perfect training conditions
2. Make sure that the anchor kit base ends at the same level as the play court so that the height settings of the basketball hoop are correct (e.g. official NBA/FIBA height 3,05 m)
3. Surround the concrete on the upper surface with a wooden frame, so that the visible base of the goal gives a nicer picture
Installation Videos Part 1 + Part 2:
Anchor Kit Installation Guide – Long Version
The videos will walk you step-by-step through the process of installing an in-ground basketball goal. Please find some more details for the installation of the Anchor Kit below:
Mixing concrete for an InGround installation
The secret to a long-lasting basketball hoop is in foundation. Achieving the correct mixture of dry concrete and water can give your goal additional years of life!
A mixture that is too thin lacks the strength needed to properly hold the steel pole in place. A mixture that is too thick will leave you struggling to fill voids that can’t be seen below, again compromising strength. So how do you achieve the perfect balance? Let’s find out!
1. Compressive Strength
Concrete is rated by its compressive strength, which means: how much pressure per square inch can a standard cylinder of concrete withstand before breaking. These ratings are derived from standardized machines which can evenly apply pressure across the surface of a concrete cylinder.
Compressive strength is largely determined by the composition of the mix. Walk into any home improvement store and you’ll see a variety of mixes that advertise ‘fast setting,’ ‘high-strength,’ ‘crack resistant,’ etc. The main difference between each of these is some mixes may contain additional ingredients, such as fiberglass, to provide even greater bond strength.
If you have a specific mix you’re looking for, then great, you already know what to get. However, if you’re simply trying to follow the instructions for your hoop, your standard ‘High-Strength’ mix will do just fine.
Goalrilla recommends purchasing 12-13 bags of Quikrete concrete mix. This concrete meets the ASTM C387 Standard Specifications for concrete.
While directions state you only need 11 bags, it’s not a bad idea to have an extra bag or two on hand in the event the installation gets a little messy. As you’ll find out, concrete mix can be difficult to move and it’s very easy to accidentally tear a bag open.
2. Mixing the Concrete
Once you have all the appropriate materials, start by opening 1-2 bags and pouring them into a large container. Add water according to what the instructions dictate.
For an 80 lb. bag, you’ll want to use 6 pints or 2.8 L of water, or for a 60 lb. bag, you’ll want to use 4 pints or 1.9 L per bag of concrete. If you don’t have measuring bucket around, a 2 L soda pop bottle will work to get a close enough estimation.
Create a depression in the center of the dry mix and add your water here. Work the mix with a hoe or other tool and ensure consistency across the batch. Properly mixed concrete should be wet, but firm enough to hold its shape and in an oatmeal-like consistency. You can test its consistency by picking up a handful while wearing gloves.
Do not let the mix sit for extended periods of time or you run the risk of letting it dry out. Move the mix to the freshly dug hole as soon as possible and agitate as you pour to help alleviate any voids. A trench shovel and extra set of hands will be helpful here.
On especially hot days you may need to add more water to the mix as water will evaporate. Always keep the mix moving and ensure the mix maintains its consistency.
Repeat these steps as necessary until you have the appropriate amount of concrete.
3. Pouring Concrete in Cold Weather
Installing your basketball hoop in winter is possible but has a few caveats. If the outside temperature is below 40° F (4° C) for an extended period of time, you will want to reconsider your install date. Temperatures below this threshold can cause all sorts of problems your average DIY installer is most likely not equipped to handle, nor would want to.
If you choose to pour concrete during the winter months, there are few things you or your installer will want to remember.
- If the ground is frozen, you will need to wait until it thaws before you can even consider starting. You should NEVER place concrete in frozen ground, since it poses a number of problems from cracking, crusting, and settling unevenly.
- Use a fast-setting mix with hot water. As the name implies, a fast-setting mix will usually set in under an hour. While it may set in under an hour, it will still take several days to cure. When mixing concrete in these temperatures, regardless of type, use hot water.
- Use an accelerator. If you don’t have access to fast-setting concrete or have already purchased regular concrete, you can purchase an accelerator that helps increase the concrete hydration rate. This helps to shorten the setting time and gets the concrete to a higher strength earlier. Avoid any accelerators or additives containing calcium chloride as this will cause the rebar to rust and could potentially cause the concrete to crack. Do not mix fast-setting concrete and an accelerator.
- Use curing blankets. Specifically, for cold-weather applications, concrete curing blankets help to trap in the heat and moisture, so the concrete can reach its proper strength. Additionally, these “blankets” protect the concrete from freezing. Blankets can be purchased from your local home improvement store for around $50-$60 depending on your area. Keep in mind they do not look like the blankets you would use in your home. These blankets look more tarp-like and usually come in rolls.
In addition to these tips, some professional installers may have other methods or tricks they use to set concrete in colder weather. In this case, it may be better to hire a professional to do the job as they will often have the necessary supplies, like curing blankets, already on hand.
As the cost of additional materials begins to add up, combined with the inconvenience of working in the cold, you may find it’s better to have someone else do it.

